Mar 2015
Permission for Transmission 2
31/03/15 11:13 Filed in: Antennae
The permission has come through today. No nasty surprises with the conditions.
I agreed for the permission to be personal to me so that when we move, or Mrs LDZ does away with me, the mast comes down.
So fingers crossed for getting it up at the weekend !
Comments
Andercon
31/03/15 08:22 Filed in: Shack Stuff
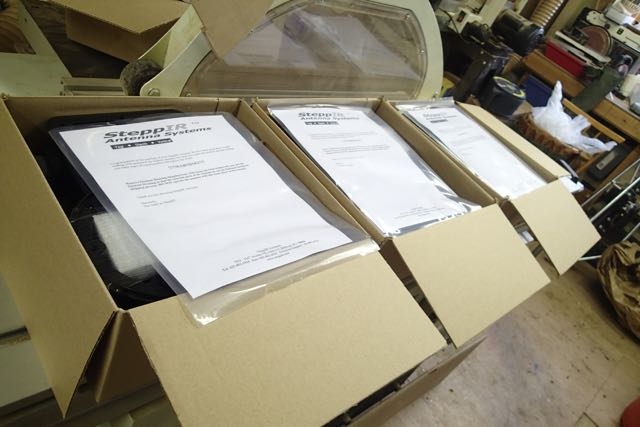
StepIR Build Day One
30/03/15 18:08 Filed in: Antennae
I had a great time with Ron at VineCom and collected the DB11 on Saturday
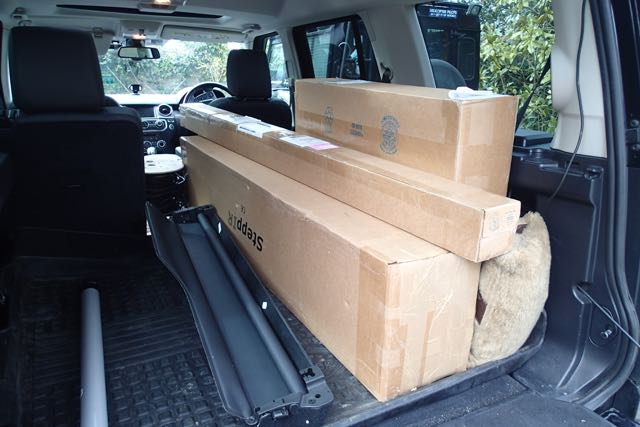
There is a fair bit to it. 3 boxes which Just fitted in the car with all the other stuff from the weekend away.
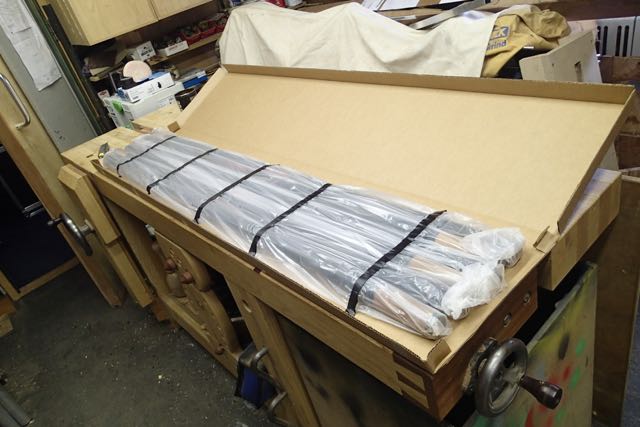
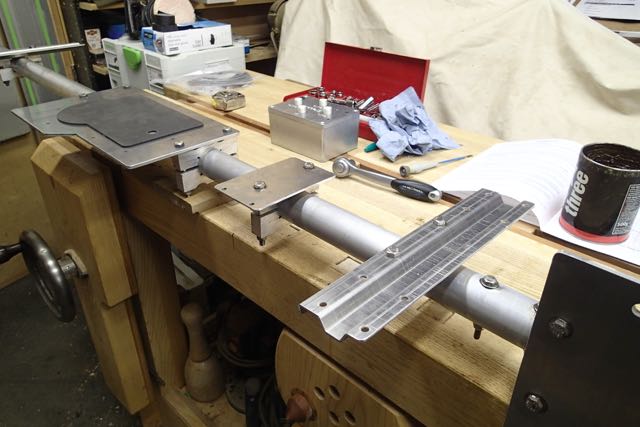
First day when we got back was spent checking the contents and setting up all the hardware on the boom. These are the fibreglass tube elements
The sweeps
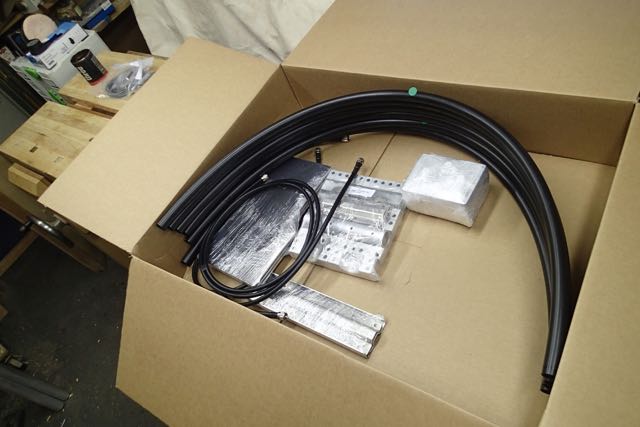
The three stepper motors
First job was the boom assembly and making sure everything is lined up and level
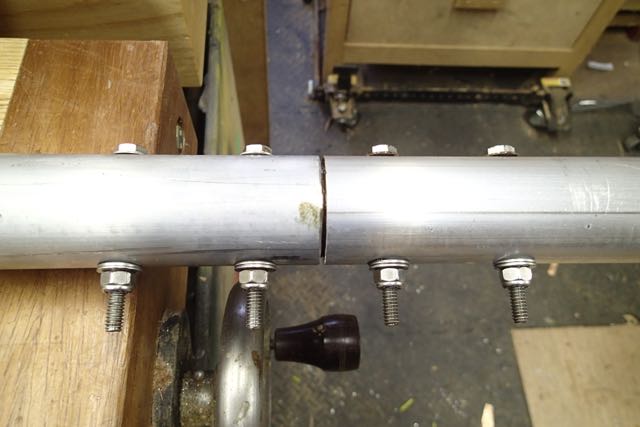
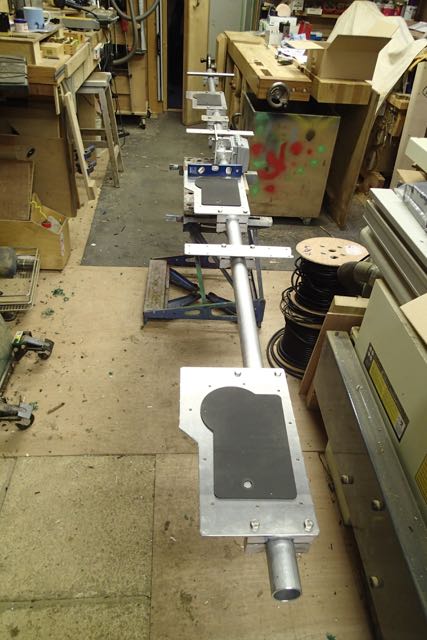
Next step will be to wire the motor units and the coax switch
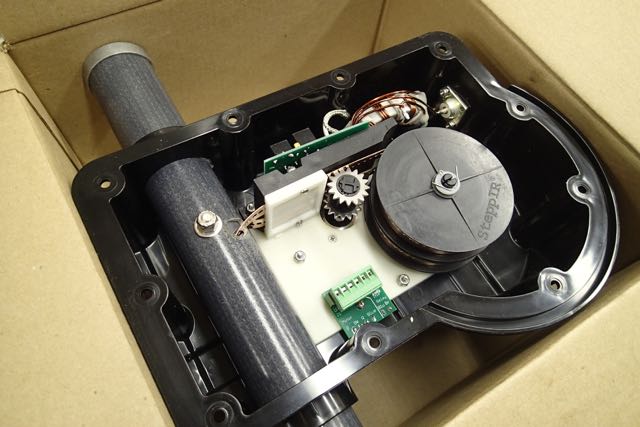
But that’s for another day. How exciting.
There is a fair bit to it. 3 boxes which Just fitted in the car with all the other stuff from the weekend away.
First day when we got back was spent checking the contents and setting up all the hardware on the boom. These are the fibreglass tube elements
The sweeps
The three stepper motors
First job was the boom assembly and making sure everything is lined up and level
Next step will be to wire the motor units and the coax switch
But that’s for another day. How exciting.
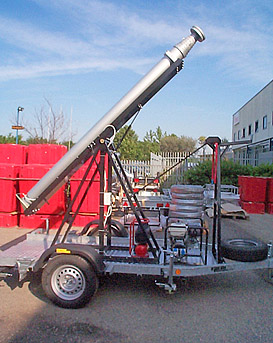
Mast Delays ??
27/03/15 08:25 Filed in: Antennae
Just had a mail from Total Mast Solutions who I am getting the pneumatic mast from. It is an ex demo one and was supposed to be out of the demonstration van for 23rd March but there are some delays, which I don’t quite understand. Lets hope its not stuck in there !
I had planned a day off to collect on Monday and for the interested Club members to help me swaying about on the scaffolding over the Bank Holiday.
Whether that happens or not we shall have to wait and see.
I like this picture. Very Thunderbirds….
I had planned a day off to collect on Monday and for the interested Club members to help me swaying about on the scaffolding over the Bank Holiday.
Whether that happens or not we shall have to wait and see.
I like this picture. Very Thunderbirds….
Looking forward to the weekend
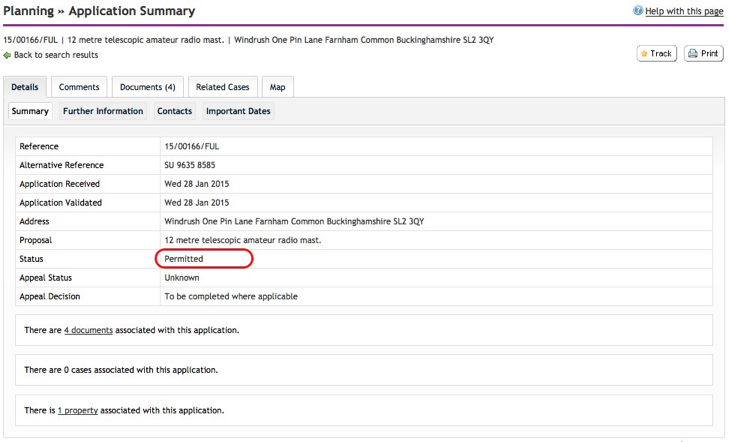
25/03/15 16:20 Filed in: Shack Stuff | Antennae
Permission For Transmission
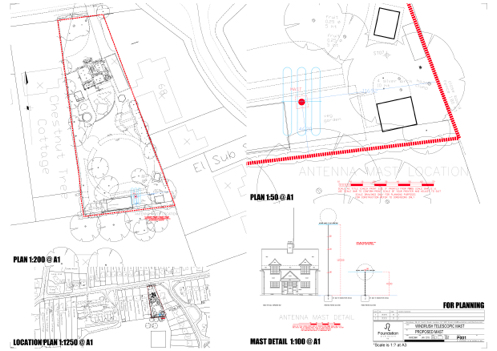
25/03/15 15:52 Filed in: Antennae
This has just been posted on the Council website.
The actual details and conditions will tell the story
Lessons from a Competition
25/03/15 08:25 Filed in: Competitions
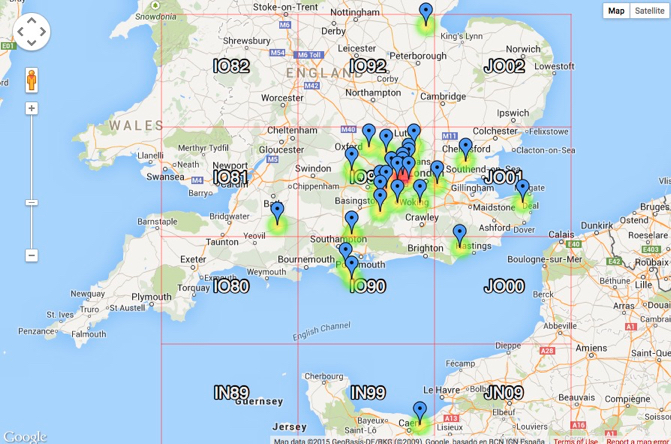
Last night I hindered Uri with the 6m UKAC contest and what a full on two and a half hours.
Conditions were not great with a load of QSB but we managed a respectable showing getting some useful multipliers and I can guaranteed if I had been doing it on my own it would have been less than half. Knowledge counts for a lot in this game.
So what did I learn/
1 You get extra "multipliers" for each Maidenhead Square that you make a QSO with. These multiply your score. Obviously. So the way to boost your score is to get as many "squares" as possible whilst also getting as many contacts as possible. For those pilots amongst us with no sense of direction, a map is helpful here.
2 To reach these distant squares you will be talking to someone with a beam. So to make a contact your beam and his have to be pointing at each other. You may have to return to try to get that needed multiplier more than once.
3 So long CQ calls are required to give them a chance to tune the radio and beam on to you. a typical call would be
"CQ CQ CQ CQ CONTEST / CQ CQ CQ CQ CONTEST / CQ CQ CQ CQ CONTEST / G3WIR/A / CQ CQ CQ CQ CONTEST / G3WIR/A G3WIR/A / CQ CONTEST"
(the slashes don't mean anything but show the sections).
4 Leave only a short pause between CQ calls to maximise your exposure and avoid anyone nicking the frequency.
5 Pick a calling frequency (make sure its clear) and put it into the memory. That way you can return to it after you have tuned around.
6 You will hear people, and some software, talking about Run and Pounce. It could sound more fun than it actually is but it means:
RUN = calling CQ (on the memory frequency ideally)
POUNCE = tuning around and returning others who are CQ-ing or RUNNING
Got it!
7 I really helps to have two people operating as when it gets frantic, especially for a new person like me, you will miss out things from the log.
8 If you have two operators run two logs to cover for mistakes. Ideally one should be computer based so you can quickly check on duplicates (you don't want to call the same person twice in these comps).
9 Learn where the likely stations are that will give you those multipliers.
10 For this competition you needed to share an RST report, a serial number that increments by one each time and your maidenhead locator. A bit like golf, there is etiquette to all this. on non HF competitions where everyone gives you 5+9 , on VHF you give actual reports. So you have to be quick at writing the call down and looking at the meter. The aim is keep the QSO as short as possible to get as many in.
So a typical QSO might go
CQ CQ CQ …..as above
GØLDZ
GØLDZ YOU ARE FIVE AND THREE (rst) / ZERO ZERO FOUR (serial number) / IN EYE OH NINETY ONE TANGO CHARLIE (locator IO91TC)
ROGER / YOU ARE FIVE AND FIVE (rst) / ZERO ONE THREE (serial number) / IN EYE OH EIGHTY TWO FOXTROT MIKE (locator IO82FM)
ALL COPIED 73/S / QRZ
You will note the IO91 bit. to keep this short no need for ITALY OSCAR unless the contact requires it.
Now none of this is necessarily correct, just my observations for you to shoot down in flames! and I am sure that there are many more tips.
So do share them if you dare!
Comments Now Possible
21/03/15 08:28 Filed in: Shack Stuff | Antennae
Iv’e updated the site to that comments are possible as are subscriptions via RSS.
So if you want to subscribe to the posts or discuss anything it should be possible. Let me know if any of it doesn’t work as this is a bit like the blind leading the blind here!
Keep an eye out for next week when we are off to Oswestry to collect the StepIR and then Leicester for the pneumatic mast.
What fun…
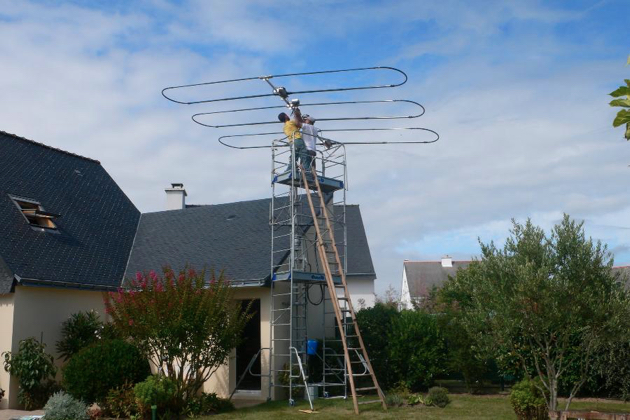
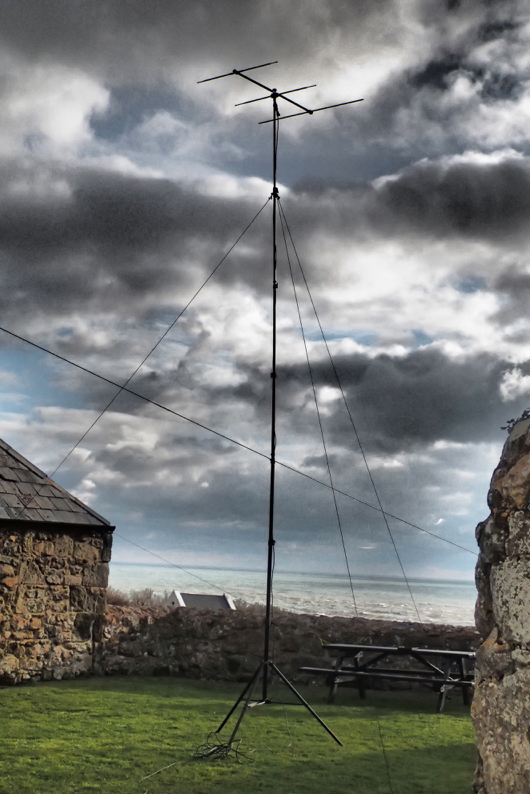
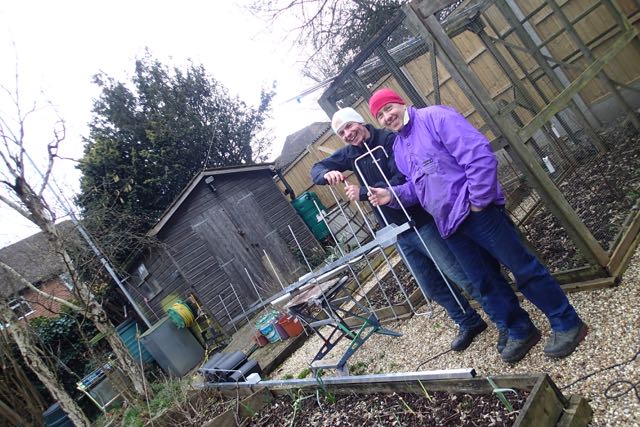
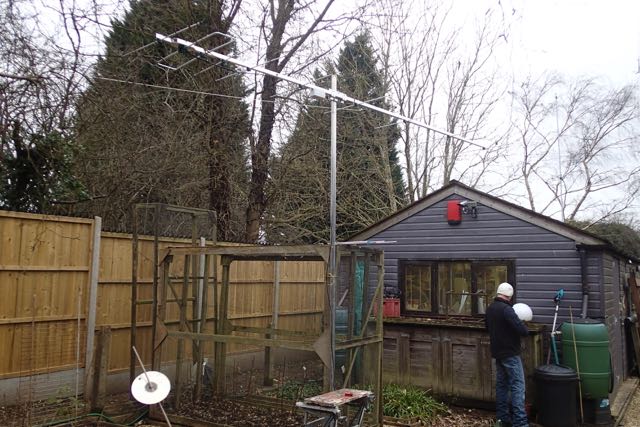
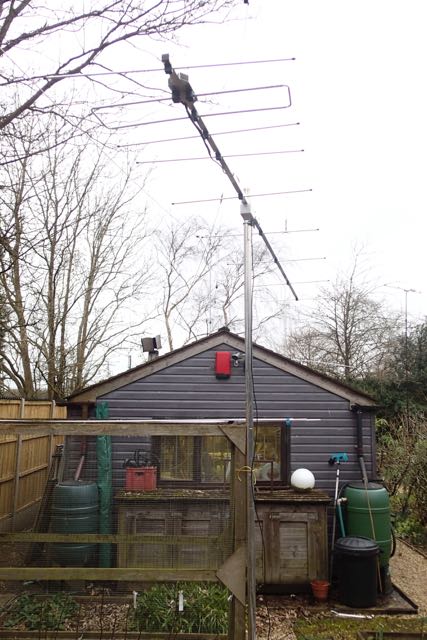
Getting it up at the weekend
09/03/15 08:00 Filed in: Antennae
Putting up the 2M beam over at 2EØSUR’s QTH
In moving the site to the DropBox some of the pictures and text have gone AWOL. I will track them down and re post.
In moving the site to the DropBox some of the pictures and text have gone AWOL. I will track them down and re post.
Buddiploe on 2M
08/03/15 08:55 Filed in: Antennae
A good read
04/03/15 14:57 Filed in: Shack Stuff
Want a good radio read.
This is recommended. And as I have now finished it you can borrow it if you want. Let me know
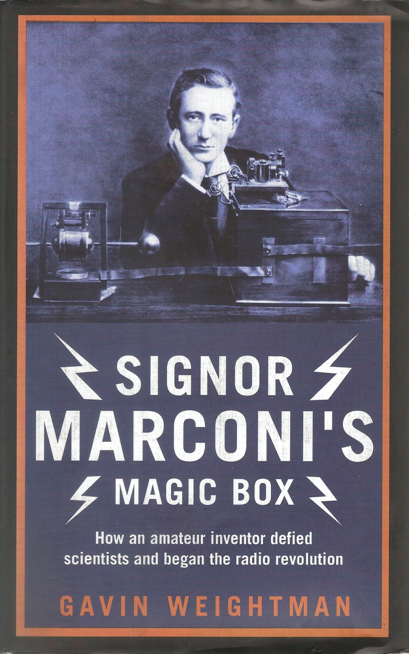
This is recommended. And as I have now finished it you can borrow it if you want. Let me know
2M UKAC
04/03/15 13:15 Filed in: Competitions
We did OK last night with the 2M competition.
Particularly given that we only had the small portable beam on the bud dipole tripod. It was good practice for what is to come.
Particularly given that we only had the small portable beam on the bud dipole tripod. It was good practice for what is to come.
Welcome
03/03/15 14:20 Filed in: Shack Stuff
CQ CQ CQ....and welcome to the radio blog.
Tonight is the first time we will be trying out the two operator approach on the RSBG 2M competition with 2EØSUR Martin.
As yet the monster beam is not ready to unleash. That will have to wait until next time.
wish us luck
Tonight is the first time we will be trying out the two operator approach on the RSBG 2M competition with 2EØSUR Martin.
As yet the monster beam is not ready to unleash. That will have to wait until next time.
wish us luck
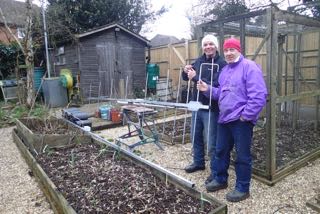
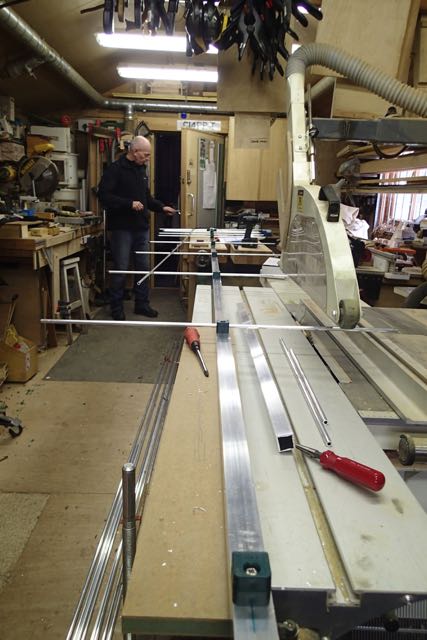
Yagi Build
03/03/15 13:26 Filed in: Antennae
To get ready for the 2M competitions I got together with Martin to make up a couple of 9 element Yagi's to Justin, GØKSC's plans.
You will find details on his website
We also sells ready built antennas for those not wanting to make them up. Innovantennas
So how did we go about it:
First off you have to decide what you are going to build. We went for a loop fed yagi with a nice 14dBi gain and a 4.5m boom. All the dimensions are on the website as are the suggested tube dimensions. You need to decide on what boom you are going to use and go and order the aluminium.
We went to Aluminium Warehouse via the internet. There is a carriage charge so if you are going to make a few aerials then it pays to buy all you need in one go. You also need to order the insulators from Justin to match the tube size that you have ordered.
When it comes you will need some tools. All pretty basic, saw, rule and the usual soldering stuff we all have. It pays to have a couple of more specialist tools such as a rivnut (or captive nut) installation tool a, pipe cutter and a tube bender. You can get away without these by buying the loop ends from Justin and fixing the insulators with self tappers.
All set? Then off we go.
1 Setting Out
All projects start with reading and understanding the plans and measuring everything out twice before committing to drilling holes.
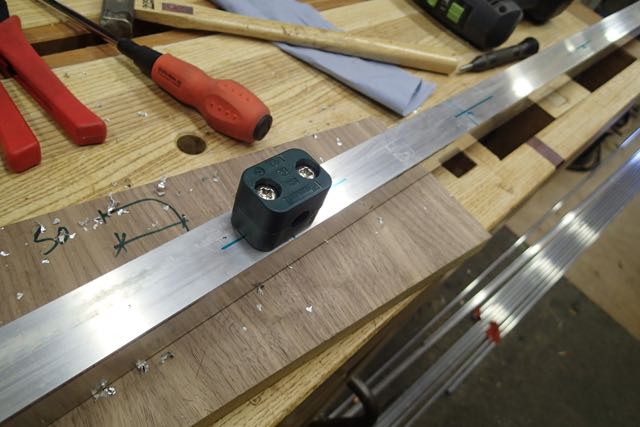
Mark the actual positions of the elements down the boom and mark the centre lines for the fixings. This one is marked L2 or the 2nd loop element.
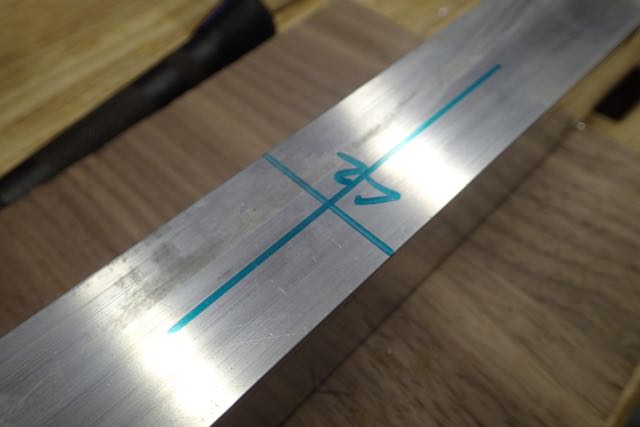
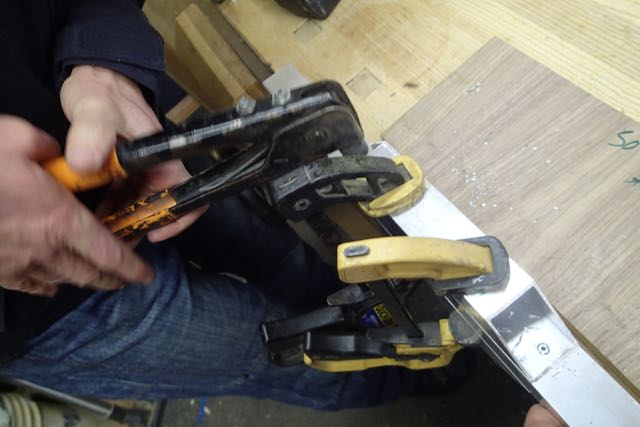
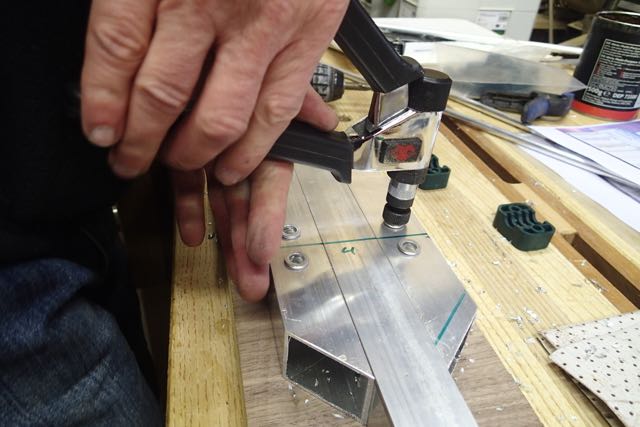
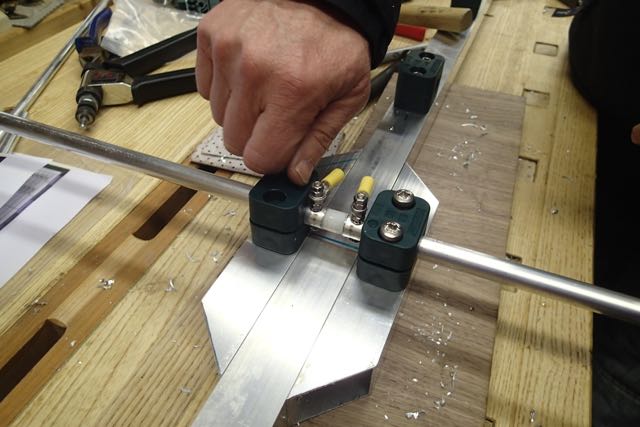
2 Riv nut fixing
I like the idea of riv nuts as you can take the elements off for transport and still have a secure fixing. Yes....we are using these for portable operation.
So look at the insulator and line up the bit where the element goes with the line you have marked. The line is NOT where the hole goes. It is where the element goes.
Some insulators have two holes and some one. Make sure you have the right ones. On ours the doubles were for the fed loop and singles for the elements.
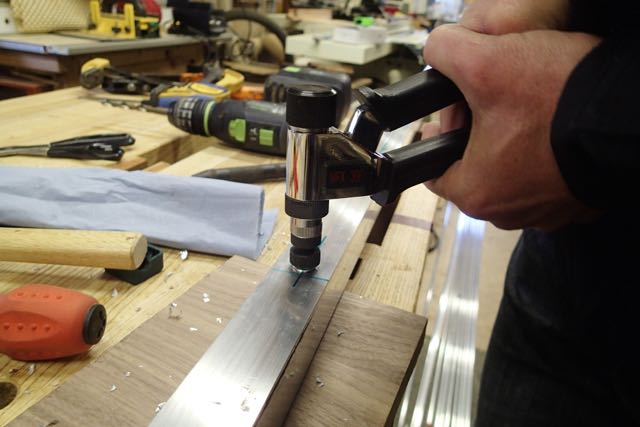
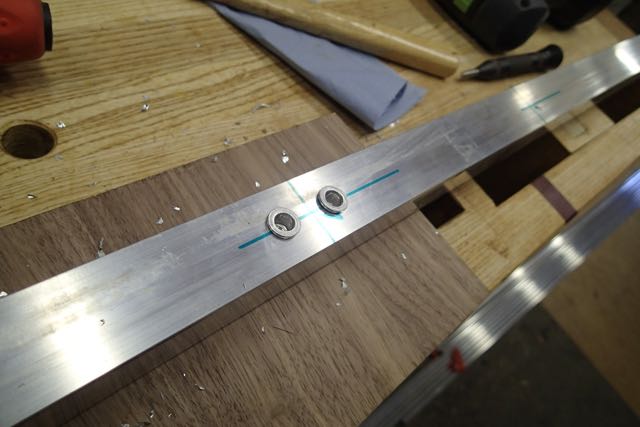
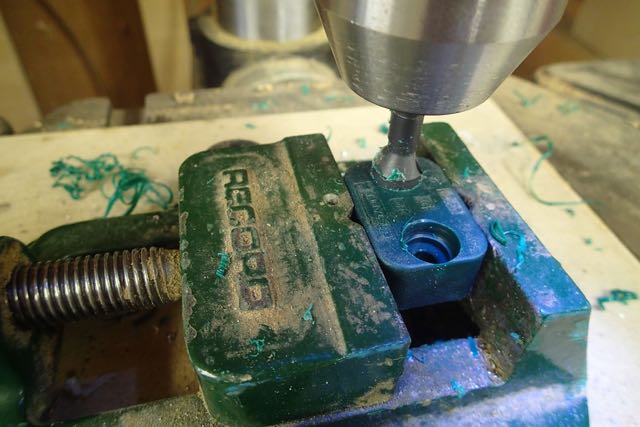
You will need to open up the bottom hole in the insulator so it sits flush on the boom over the riv nut
This is what we are aiming for and below is how we get there in more detail.
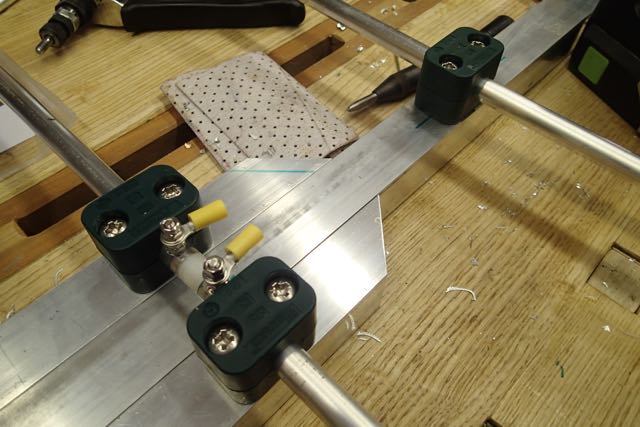
3 Driven Element Fixing
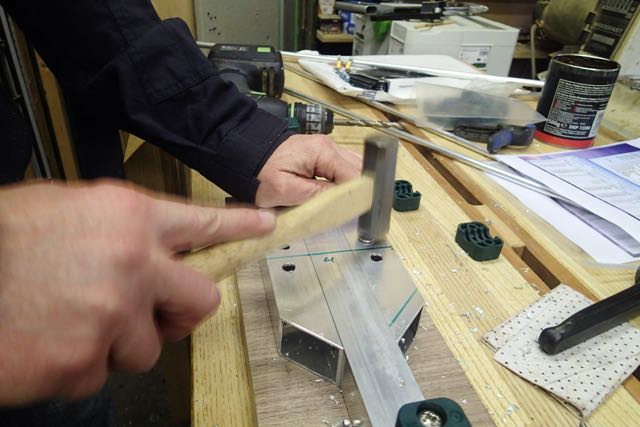
The driven element is like a dipole and has an insulator between a split tube. The supports will be off each side of the boom so we need to widen it at the driven element.
You will have some of the boom left over which you can chop into two bits and then angle the ends at 45 degrees.
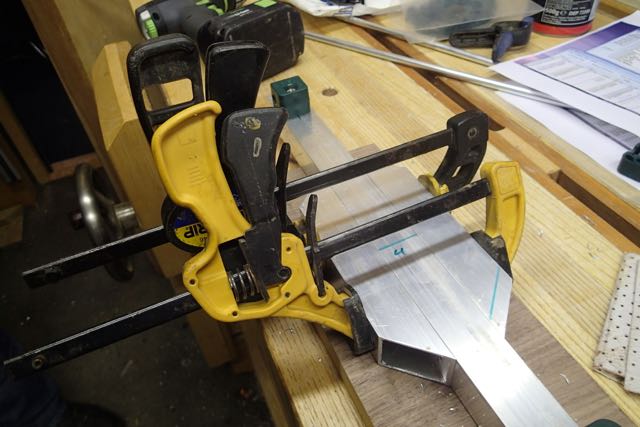
Then pop rivet these on where the 45 degree bit is cut
Then set out the insulators again and drill holes for them
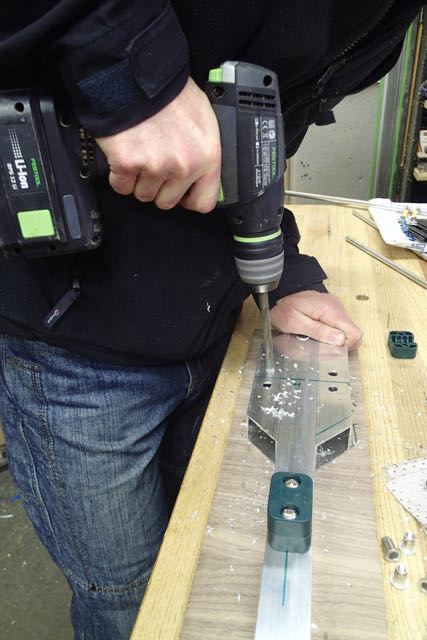
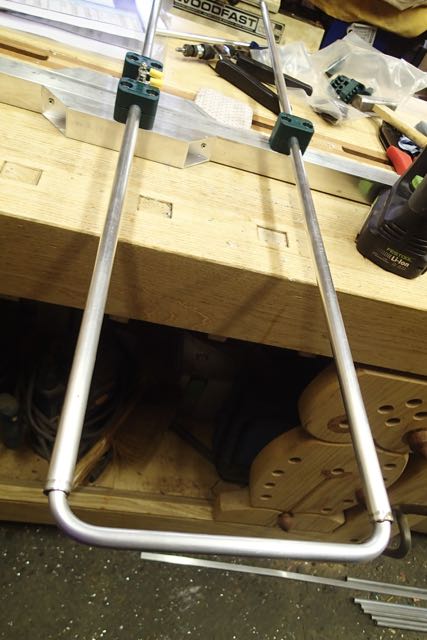
4 Driven Element
You should have also brought Justin's insulator for the driven element to make life easy. Fit it into the two lengths of tube you have cut and drill through for the connecting bolts.
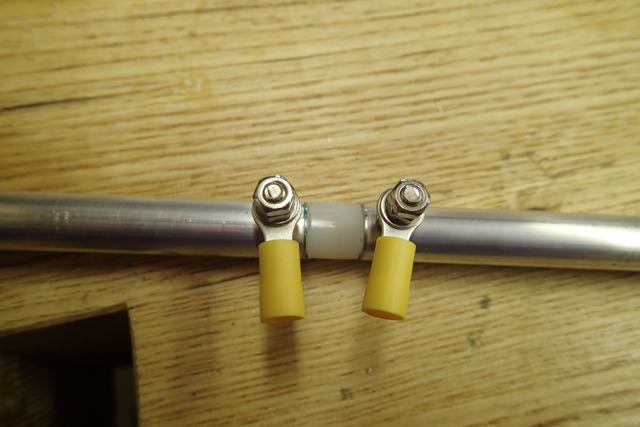
You can then fix that into the insulators. It should look something like this
5 Loop Ends
You might have brought these from Justin. I did with my first beam. Or you have bent them using a tube bender (mine is a brake pipe bender) to EXACTLY the right dimensions
These are the bits you need to adjust at the end to tune the antenna, so make sure they slide in and out. Once you have tuned them you can pop rivet or self tap in place.
6 Elements
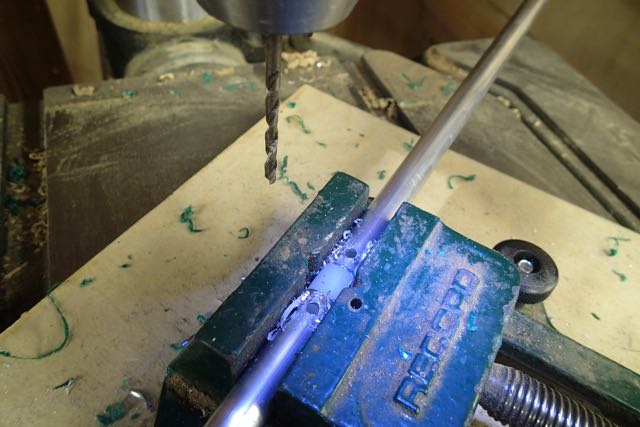
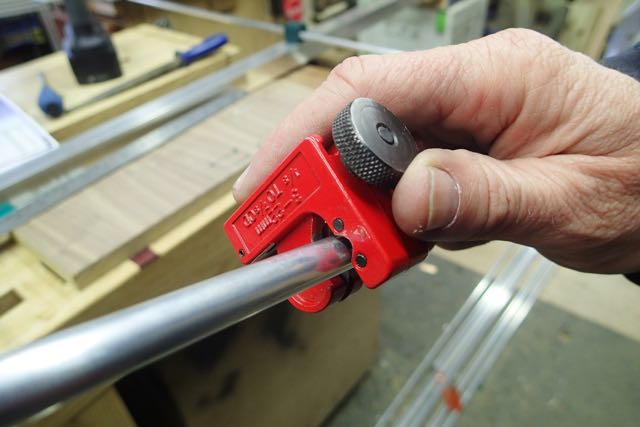
Next bit is easy. Cut the elements to the right lengths and fit them into the insulators. Using a small tube cutter makes a neat job of it.
7 Balun
I should have taken more pictures of this but we were getting excited about testing!
Justin has details of something called Pawsey Stub. Don't ask me how it works - i'm only an intermediate!!. We just followed the instructions and bingo it works.
More radio magic.
The idea is that you connect the centre coax feed point onto the loop back to the braid of the coax by 1/4 wave. That needs to be exact and, here you are going to be really impressed, because you need to take into account the velocity factor. Of course. You find that in the data from whoever makes your coax. It is the amount that the coax slows down the speed of the wave - so if you have more than 1 it is not the right figure.
A quick calculation
speed of light/frequency x velocity factor x quarter (WAVE)
or in our case
300/144.3 x .83 x .25 = 43.1cm
Cut a lengthy of wire to that length and join the core at the feed point back to the shield. I stripped off a small bit of the covering and soldered it on and then wrapped the lot in self amalgamating tape.

8 Testing Testing......
As yet I haven't got a mast to put it on so we did a quick test in the rain on a 10' pole.
You need to adjust the loops that you bent to give the right SWR and we ended up taking 10mm off ours as we made them oversize to start with. It's easier to cut off than to stick back on!
Heres what we got.
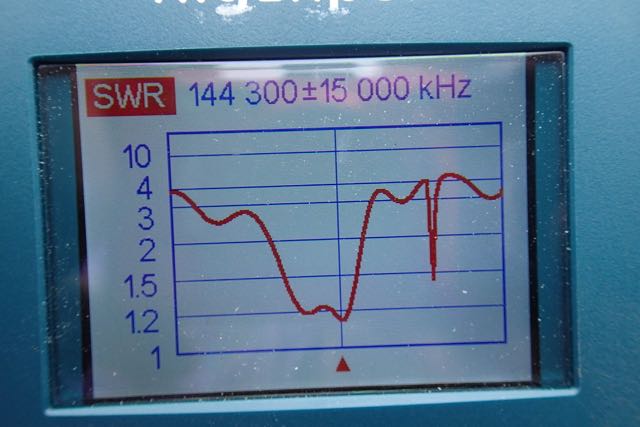
And here it is.
We will update the blog when it has been tested properly. But we are excited that they are going to be so good!
You will find details on his website
We also sells ready built antennas for those not wanting to make them up. Innovantennas
So how did we go about it:
First off you have to decide what you are going to build. We went for a loop fed yagi with a nice 14dBi gain and a 4.5m boom. All the dimensions are on the website as are the suggested tube dimensions. You need to decide on what boom you are going to use and go and order the aluminium.
We went to Aluminium Warehouse via the internet. There is a carriage charge so if you are going to make a few aerials then it pays to buy all you need in one go. You also need to order the insulators from Justin to match the tube size that you have ordered.
When it comes you will need some tools. All pretty basic, saw, rule and the usual soldering stuff we all have. It pays to have a couple of more specialist tools such as a rivnut (or captive nut) installation tool a, pipe cutter and a tube bender. You can get away without these by buying the loop ends from Justin and fixing the insulators with self tappers.
All set? Then off we go.
1 Setting Out
All projects start with reading and understanding the plans and measuring everything out twice before committing to drilling holes.
Mark the actual positions of the elements down the boom and mark the centre lines for the fixings. This one is marked L2 or the 2nd loop element.
2 Riv nut fixing
I like the idea of riv nuts as you can take the elements off for transport and still have a secure fixing. Yes....we are using these for portable operation.
So look at the insulator and line up the bit where the element goes with the line you have marked. The line is NOT where the hole goes. It is where the element goes.
Some insulators have two holes and some one. Make sure you have the right ones. On ours the doubles were for the fed loop and singles for the elements.
You will need to open up the bottom hole in the insulator so it sits flush on the boom over the riv nut
This is what we are aiming for and below is how we get there in more detail.
3 Driven Element Fixing
The driven element is like a dipole and has an insulator between a split tube. The supports will be off each side of the boom so we need to widen it at the driven element.
You will have some of the boom left over which you can chop into two bits and then angle the ends at 45 degrees.
Then pop rivet these on where the 45 degree bit is cut
Then set out the insulators again and drill holes for them
4 Driven Element
You should have also brought Justin's insulator for the driven element to make life easy. Fit it into the two lengths of tube you have cut and drill through for the connecting bolts.
You can then fix that into the insulators. It should look something like this
5 Loop Ends
You might have brought these from Justin. I did with my first beam. Or you have bent them using a tube bender (mine is a brake pipe bender) to EXACTLY the right dimensions
These are the bits you need to adjust at the end to tune the antenna, so make sure they slide in and out. Once you have tuned them you can pop rivet or self tap in place.
6 Elements
Next bit is easy. Cut the elements to the right lengths and fit them into the insulators. Using a small tube cutter makes a neat job of it.
7 Balun
I should have taken more pictures of this but we were getting excited about testing!
Justin has details of something called Pawsey Stub. Don't ask me how it works - i'm only an intermediate!!. We just followed the instructions and bingo it works.
More radio magic.
The idea is that you connect the centre coax feed point onto the loop back to the braid of the coax by 1/4 wave. That needs to be exact and, here you are going to be really impressed, because you need to take into account the velocity factor. Of course. You find that in the data from whoever makes your coax. It is the amount that the coax slows down the speed of the wave - so if you have more than 1 it is not the right figure.
A quick calculation
speed of light/frequency x velocity factor x quarter (WAVE)
or in our case
300/144.3 x .83 x .25 = 43.1cm
Cut a lengthy of wire to that length and join the core at the feed point back to the shield. I stripped off a small bit of the covering and soldered it on and then wrapped the lot in self amalgamating tape.
8 Testing Testing......
As yet I haven't got a mast to put it on so we did a quick test in the rain on a 10' pole.
You need to adjust the loops that you bent to give the right SWR and we ended up taking 10mm off ours as we made them oversize to start with. It's easier to cut off than to stick back on!
Heres what we got.
And here it is.
We will update the blog when it has been tested properly. But we are excited that they are going to be so good!